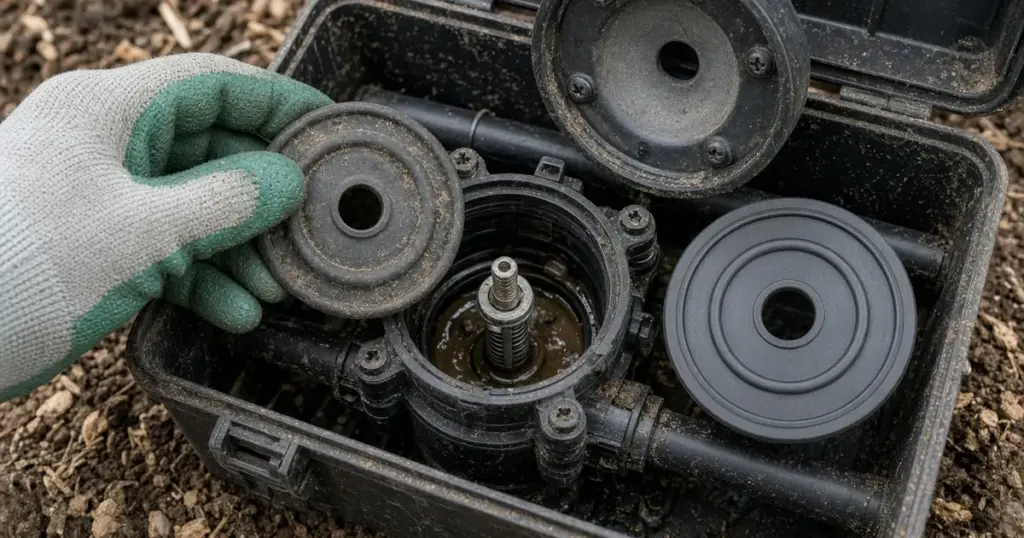
Inside most residential sprinkler valves is a flexible rubber diaphragm. It is the part that actually opens and closes the flow of water to a zone. When the solenoid on top of the valve releases a little water pressure from above the diaphragm, the diaphragm lifts and water flows through to the heads. When the solenoid closes, pressure builds back up above the diaphragm and pushes it down onto its seat, shutting the zone off.
Because the diaphragm flexes every time a zone runs and sits in water constantly, it eventually wears, tears, or gets debris caught under it. Replacing it is one of the more common valve repairs, and with care it is a manageable job for a handy homeowner. This guide explains the warning signs, the replacement steps, and the mistakes to avoid, with notes for systems in Huntsville, TX and Walker County.
How a Diaphragm Valve Works
Understanding the basics makes troubleshooting much easier.
- Water enters the valve body below the diaphragm.
- A tiny port lets some water pass to the chamber above the diaphragm, where it builds pressure and holds the diaphragm closed.
- The solenoid opens a small passage that bleeds water from the upper chamber when the zone is called to run. Pressure above drops, and the diaphragm lifts.
- When the solenoid closes, the upper chamber refills and the diaphragm seats again.
Anything that interferes with that balance, such as a tear in the diaphragm, a blocked port, or grit on the seat, can make a valve stick open, refuse to open, or weep water when it should be closed. The valves and wiring guide explains other valve components.
Signs the Diaphragm May Be the Problem
- The zone will not shut off, or keeps running after the controller stops it.
- Heads weep water continuously at the low point of the zone even when it is off.
- The zone turns on by itself or opens slowly and weakly.
- The valve opens with the manual bleed but not electrically, or the reverse. In this case, the solenoid may be the issue instead; see testing and replacing a sprinkler solenoid.
Keep in mind that water draining out of low heads for a short time after a zone shuts off is usually low-head drainage, not a valve problem. Our article on low-head drainage explains the difference. Our existing post on a sprinkler zone that won’t shut off covers other causes of a stuck-open valve.
What You Need
- The correct replacement diaphragm for your valve’s brand and model. Diaphragms are not universal.
- A screwdriver or the tool needed to remove the bonnet screws.
- A towel and a small container for screws.
- A phone camera to photograph the assembly before taking it apart.
Step-by-Step Replacement
1. Find the valve
Locate the valve box for the zone. If you cannot find it, see how to find buried sprinkler valves.
2. Shut off the water
Close the irrigation supply or the main shutoff. A valve opened under pressure will spray water and can lose small parts.
3. Relieve pressure
Open the manual bleed screw or lever, or run the zone briefly after closing the supply, to drain pressure from the valve.
4. Clean around the valve
Remove soil and debris around the bonnet so nothing falls into the valve when you open it.
5. Remove the bonnet
Unscrew the bonnet screws or the threaded bonnet. Keep track of the spring, which sits on top of the diaphragm on many valves. Photograph the orientation of every part.
6. Inspect the diaphragm and seat
Look for tears, stretched rubber, debris on the seat, and blocked ports. Sometimes cleaning debris from the seat or port solves the problem without replacing anything.
7. Install the new diaphragm
Seat it exactly as the old one sat, with any alignment tabs or ports matched to the body. Replace the spring in its correct position.
8. Reassemble
Tighten the bonnet evenly, alternating screws if there are several, to avoid a crooked seal. Do not overtighten plastic parts.
9. Turn the water back on slowly
Open the supply gradually and check the bonnet for leaks.
10. Test the zone
Run the zone from the controller and watch it open and close. Then confirm the heads stop flowing after it shuts off.
Common Reassembly Mistakes
- Losing or misplacing the spring. The valve may not close.
- Misaligned diaphragm, which blocks the bleed port.
- Debris left on the seat, which prevents a tight seal.
- Cross-threading a bonnet or cracking plastic by overtightening.
- Installing the wrong diaphragm for the valve model.
If the Valve Still Misbehaves
A new diaphragm should fix a torn-diaphragm problem right away. If the valve still sticks open, check the solenoid next; a solenoid plunger that is stuck or missing its spring will keep the bleed passage open. If the valve will not open at all, make sure the flow control handle, if your valve has one, was not turned down during the repair, and confirm the solenoid is getting voltage from the controller.
Preventing Future Failures
- Flush lines after any pipe repair to keep debris out of valves.
- Filter well water before it reaches the valves.
- Keep valve boxes covered and clear of soil.
- Replace aging valves if diaphragms fail repeatedly or parts are unavailable.
When to Call a Pro
Call a professional if you cannot identify the valve model, if replacement parts are not available, if the valve still sticks after a new diaphragm, if the valve body is cracked, or if the valve sits in a flooded box or a hard-to-reach spot. A technician can rebuild or replace the valve and check the rest of the zone. We repair valves for homes throughout Huntsville and Walker County. See our sprinkler repair page and services page.
Frequently Asked Questions
How do I know which diaphragm to buy?
Check the brand and model on the valve’s bonnet. Replacement diaphragms are made for specific valve series.
Can debris cause the same symptoms as a torn diaphragm?
Yes. Grit on the seat or a blocked port can keep a valve from closing. Cleaning sometimes solves it.
Should I replace the whole valve instead?
If the body is cracked, the valve is very old, or parts are unavailable, replacing the valve makes more sense.
Get Your Valve Working Again
If a zone will not shut off or keeps weeping, call 346-586-6060 or schedule a repair.